很久以前就想写一篇Spring Mvc上传文件的文章,但是一直都比较忙,趁着今天比较闲,就先为大家介绍一下Spring Mvc提交form表单上传文件。老规矩,coding云还提供在线系统演示,大家可以看着本文,同时对照着演示案例学习。上传文件系统演示
一、首先,我们要准备好form表单,代码示例如下:
<div class="panel-body">
   	<form id ="firstUpdateForm" action="/demo/upload/firstUpload" method="post"
	    enctype="multipart/form-data" class="form-horizontal" role="form" target="hidden_frame">
		<div class="modal-body">
			<div class="form-group">
			<label class="col-sm-3 control-label">上传文件</label>
			<div class="col-sm-5">
			    <input type="file" id="firstDemoImgFile" name="imgFile">
			</div>
			</div>
		</div>
		<div class="modal-footer">
			<div id="firstUploadSucceed" style="display: none;">
			    <strong>新增成功!</strong><span id="firstUploadSucceedMsg"></span>
			</div>
			<div id="firstUploadFailed" style="display: none;">
			    <strong>对不起!新增失败</strong><span id="firstUploadFailedMsg"></span>
			</div>
		    <button id="createPeriadBtn" type="submit" class="btn btn-default">确定 </button>
		</div>
	</form>
	<iframe name='hidden_frame' id="hidden_frame" style='display:none'></iframe>
</div>
这里先详细介绍一下该form表单里重要的东西:
- form表单提交的类型一定要加上enctype="multipart/form-data",这是提交媒体文件的声明
- form表单提交的target="hidden_frame",这是为了后台处理完成后返回结果刷新name为hidden_frame的iframe,这样就不会刷新当前页面了,大家可以对照上传文件系统演示,提交成功、失败会打印操作结果信息,就是利用这个实现的,模仿了ajax的方式,ajax是不能提交文件到后台的。
-
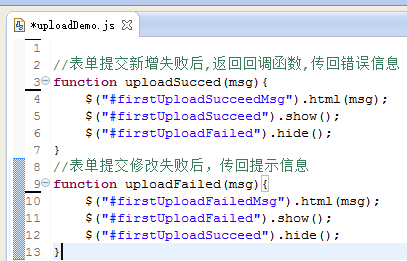
为了打印后台返回的结果,这个jsp文件需要引用一个js文件,uploadDemo.js,当controller返回操作结果后,会调用成功、失败的方法,在页面打印出结果,这里请和下面介绍的controller联系起来理解。

二、后台controller接收请求,代码示例如下:
@Controller
@RequestMapping("/demo/upload")
public class UploadController extends BaseController {

	@Autowired
	private UploadDemoService uploadDemoService;

	/**
	 * 第一种Spring Mvc上传文件,提交form表单文件到一个frame,刷新该frame,页面打印出返回的结果
	 * @param request
	 * @param demo
	 * @return
	 */
	@RequestMapping(value = "firstUpload", method = RequestMethod.POST)
	@ResponseBody
	public Object firstUpload(HttpServletRequest request, UploadDemoVo demo){
		logger.info("firstUpload info:" + demo.toString());
		boolean flag = false;
		//errorMessage:上传失败,则是错误信息;上传成功,则提示成功以及显示文件上传后的地址
		String errorMessage = "";
		try{
			flag = uploadDemoService.uploadForm(demo);
			errorMessage += "文件地址:http://demo.codingyun.com/demoFileDirectory/" + demo.getImgFile().getOriginalFilename();
		}catch (ServiceException serviceE){
			logger.error("firstUpload failed!" , serviceE);
			errorMessage = serviceE.getMessage();
		}catch (Exception e){
			logger.error("firstUpload failed!" , e);
			errorMessage = "新增文件失败!";
		}
		if(flag){
		        //上传成功,返回到前台,调用uploadSucced()这个方法
                        return "<script>window.parent.uploadSucced('" + errorMessage + "');</script>";
		}
		//上传失败,返回到前台,调用uploadFailed()这个方法
		return "<script>window.parent.uploadFailed('" + errorMessage + "');</script>";
	}
}
controller接收图片属性的实体类UploadDemoVo,源码如下:
public class UploadDemoVo {

	/**
	 * 文件
	 */
	private MultipartFile imgFile;

	public MultipartFile getImgFile() {
		return imgFile;
	}

	public void setImgFile(MultipartFile imgFile) {
		this.imgFile = imgFile;
	}

	@Override
	public String toString() {
		return "UploadDemoVo [imgFile=" + imgFile + "]";
	}

	public boolean validateFile() throws ServiceException{
		if(!ConstantUtil.fileTypeImg.contains(this.getImgFile().getContentType())){
			throw new ServiceException("文件类型只能是jpeg、png!");
		}
		if(this.getImgFile().getSize() > 1000 * 100){
			throw new ServiceException("文件最大不能超过100KB!");
		}
		return true;
	}

}
这里的controller我已经将注释写好,大家可以理解一下,若有不明白的可以随时在本页下方留言给我。
三、controller会调用后台service保存图片到服务器UploadDemoService,该service已经注入到controller中,源码如下:
这个是接口
public interface UploadDemoService {

	/**
	 * 上传文件到指定路径
	 * destinationDir 目标路径
	 * 2014年6月10日
	 */
	public boolean uploadFile(String destinationDir, MultipartFile file, String filename) throws Exception;

}
这个是接口的实现类
@Service
public class UploadDemoServiceImpl implements UploadDemoService {

	@Override
	public boolean uploadForm(UploadDemoVo demo) throws Exception {
		demo.validateFile();
		uploadFile(
		    "E:/test", demo.getImgFile(), demo.getImgFile().getOriginalFilename());
		return true;
	}

	private boolean uploadFile(String destinationDir, MultipartFile file, String filename)
			throws Exception {
		 logger.info("文件长度: " + file.getSize());
         logger.info("文件类型: " + file.getContentType());
         logger.info("文件名称: " + file.getName());
         logger.info("文件原名: " + file.getOriginalFilename());
         logger.info("========================================");
         try {
             SaveFileFromInputStream(file.getInputStream(), destinationDir, filename);
         } catch (IOException e) {
             logger.info(e.getMessage());
             return false;
         }
		return true;
	}

	 /**保存文件
           * @param stream
           * @param path
           * @param filename
           * @throws IOException
         */
         private void SaveFileFromInputStream(InputStream stream,String path,String filename)
               throws IOException {
               FileOutputStream outputStream = new FileOutputStream( path + "/"+ filename);
	       int byteCount = 0;
	       byte[] bytes = new byte[1024];
	       while ((byteCount = stream.read(bytes)) != -1){
	            outputStream.write(bytes, 0, byteCount);
	       }
	       outputStream.close();
	       stream.close();
         }

}
四、测试效果
最后再跟大家说下,对照着上传文件系统演示,再看该文档会更容易理解,也更容易学会。如果大家有什么问题,请在底部留言,我会及时回复。
(转载本站原创文章请注明作者与出处Coding云--codingyun.com)


